
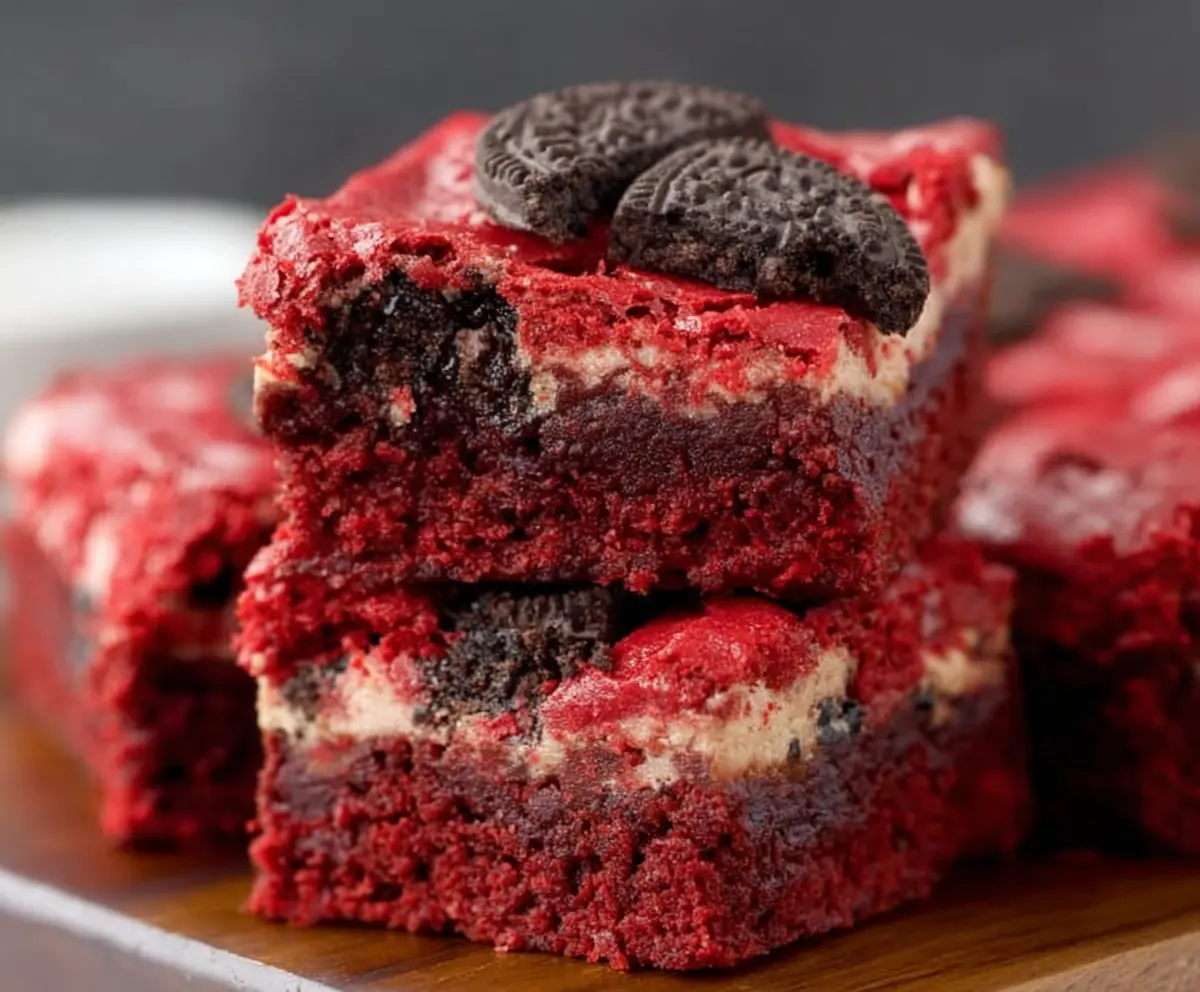
These Oreo Red Velvet Brownies are a delicious treat that’s super soft and moist. With rich red velvet flavor and creamy Oreo chunks, they are hard to resist!
Honestly, who can say no to red velvet and Oreos combined? I often bake a batch just to enjoy them with friends—they never last long! 😄
Making these brownies is a breeze! Just mix, pour, and bake. I love enjoying them warm with a scoop of ice cream on top—yummy!
Key Ingredients & Substitutions
All-Purpose Flour: This is your main structure builder for the brownies. If you need a gluten-free option, almond flour or a gluten-free blend works well!
Cocoa Powder: Unsweetened cocoa gives the brownies that rich chocolate flavor. You can substitute this with Dutch-processed cocoa for a slightly different taste. Just adjust the baking powder accordingly!
Butter: Melting the butter makes mixing easier. If you’re looking for a lighter option, coconut oil can be a great substitute, but it may add a subtle coconut flavor.
Sour Cream: This adds moisture and richness. If you’re out, plain yogurt or even buttermilk can work in a pinch without changing the overall texture much.
Oreos: The star of this recipe! If you want a different flavor, feel free to use a different kind of cream-filled cookie—or for a healthier twist, try a homemade version using whole-grain cookies.
Cream Cheese: This gives a nice creamy texture. If you’re dairy-free, you can use a vegan cream cheese alternative, which works surprisingly well!
How Do You Create the Perfect Cream Cheese Swirl?
The cream cheese layer is essential for that delicious marbled effect! To get it just right, follow these tips:
- Soften the cream cheese to room temperature. This makes it easier to mix smoothly.
- Beat it with sugar and vanilla until creamy. This helps incorporate air and improves texture.
- When layering, drop spoonfuls of the mixture on the brownie batter rather than spreading it. Then use a knife to swirl gently, creating that marbled look.
Remember, less is more when swirling! Too much mixing can blend the layers instead of keeping them distinct. Enjoy the contrast of flavors and textures in every bite!
Oreo Red Velvet Brownies
Ingredients You’ll Need:
Brownie Base:
- 1 cup (125g) all-purpose flour
- 1/4 cup (22g) unsweetened cocoa powder
- 1 tsp baking powder
- 1/2 tsp salt
- 1/2 cup (115g) unsalted butter, melted
- 1 cup (200g) granulated sugar
- 2 large eggs
- 2 tsp vanilla extract
- 1 tbsp red food coloring
- 1/2 cup sour cream or plain yogurt
- 1 cup Oreo cookies, roughly chopped (reserve some for topping)
For the Cream Cheese Layer:
- 4 oz (115g) cream cheese, softened
- 1/4 cup (50g) granulated sugar
- 1/2 tsp vanilla extract
How Much Time Will You Need?
This recipe will take about 15 minutes to prepare and 30-35 minutes to bake, plus some time to cool completely. In total, you’ll spend around 50-60 minutes before you can slice into these delicious brownies!
Step-by-Step Instructions:
1. Preheat the Oven:
Start by preheating your oven to 350°F (175°C). While it’s warming up, take a moment to grease and line an 8×8-inch baking pan with parchment paper. The overhang will help you lift the brownies out later. Super handy!
2. Mix the Dry Ingredients:
In a medium-sized bowl, sift together the all-purpose flour, cocoa powder, baking powder, and salt. This will help eliminate any lumps and ensure an even texture in your brownies. Set this bowl aside for now.
3. Combine Butter and Sugar:
In a large bowl, whisk the melted butter and granulated sugar together until nicely combined. This mixture should look a bit glossy.
4. Add Eggs and Flavorings:
Add the eggs into the butter and sugar mix, one at a time. Make sure to mix well after each addition. Then, stir in the vanilla extract and red food coloring until everything is blended smoothly.
5. Add the Sour Cream:
Mix in the sour cream (or yogurt!) until smooth. This makes your brownies rich and moist. Yum!
6. Combine Dry Ingredients:
Gradually fold in the dry ingredient mixture into the wet mixture. Stir gently until just combined—be careful not to overmix it or your brownies might turn out dense!
7. Add the Oreos:
Now, fold in the roughly chopped Oreo cookies gently. You want those little chunks of deliciousness throughout your brownies, but don’t crush them too much!
8. Pour into the Pan:
Pour half of the brownie batter into your prepared pan and spread it out evenly to form a nice layer.
9. Prepare the Cream Cheese Layer:
In a separate bowl, beat together the softened cream cheese, granulated sugar, and vanilla extract until creamy. This should be smooth and spreadable.
10. Create the Cream Cheese Swirl:
Drop spoonfuls of the cream cheese mixture over the brownie batter in the pan. Use a knife to gently swirl it for that pretty marbled effect. Don’t overdo it—just a few swirls for a luscious look!
11. Finish with the Brownie Batter:
Now, pour the remaining brownie batter on top, spreading it carefully to cover the cream cheese layer.
12. Add the Final Touch:
Sprinkle the reserved crushed Oreos on top for a fun finishing touch.
13. Bake:
Place your pan in the preheated oven and bake for 30-35 minutes. When done, a toothpick inserted into the center should come out with a few moist crumbs—but not wet batter!
14. Let Cool:
Allow the brownies to cool completely in the pan on a wire rack. This is important to make slicing easier and to let those flavors settle.
15. Serve and Enjoy!
Once cooled, lift the brownies out of the pan using the parchment paper overhang. Slice them into squares, serve, and enjoy your rich, fudgy Oreo Red Velvet Brownies! They’re sure to be a hit!
This recipe will give you delicious brownies filled with moist red velvet layers, creamy cream cheese swirls, and crunchy Oreo bits—it’s a treat worth sharing (or keeping all to yourself!).
Can I Use Different Types of Oreos for This Recipe?
Absolutely! You can use any Oreo flavor you like, such as double-stuffed, peanut butter, or even seasonal flavors like peppermint. Just keep in mind that it might slightly alter the overall taste of the brownies.
How Can I Store Leftover Brownies?
Store your leftover brownies in an airtight container at room temperature for up to 3 days. If you’d like to keep them longer, you can refrigerate them for up to a week, or freeze them for up to 3 months. Just make sure to wrap them tightly to avoid freezer burn!
Can I Make These Brownies Gluten-Free?
Yes! Simply substitute the all-purpose flour with a 1:1 gluten-free baking flour. Make sure that the other ingredients you use, especially the baking powder and Oreos, are also labeled gluten-free to ensure the entire recipe is safe for gluten-sensitive diets.
What If I Don’t Have Red Food Coloring?
If you don’t have red food coloring, you can skip it, but your brownies will have a darker tan color instead of the classic red. Alternatively, you can use beet juice as a natural coloring agent, which will also give you that beautiful hue without artificial dyes!