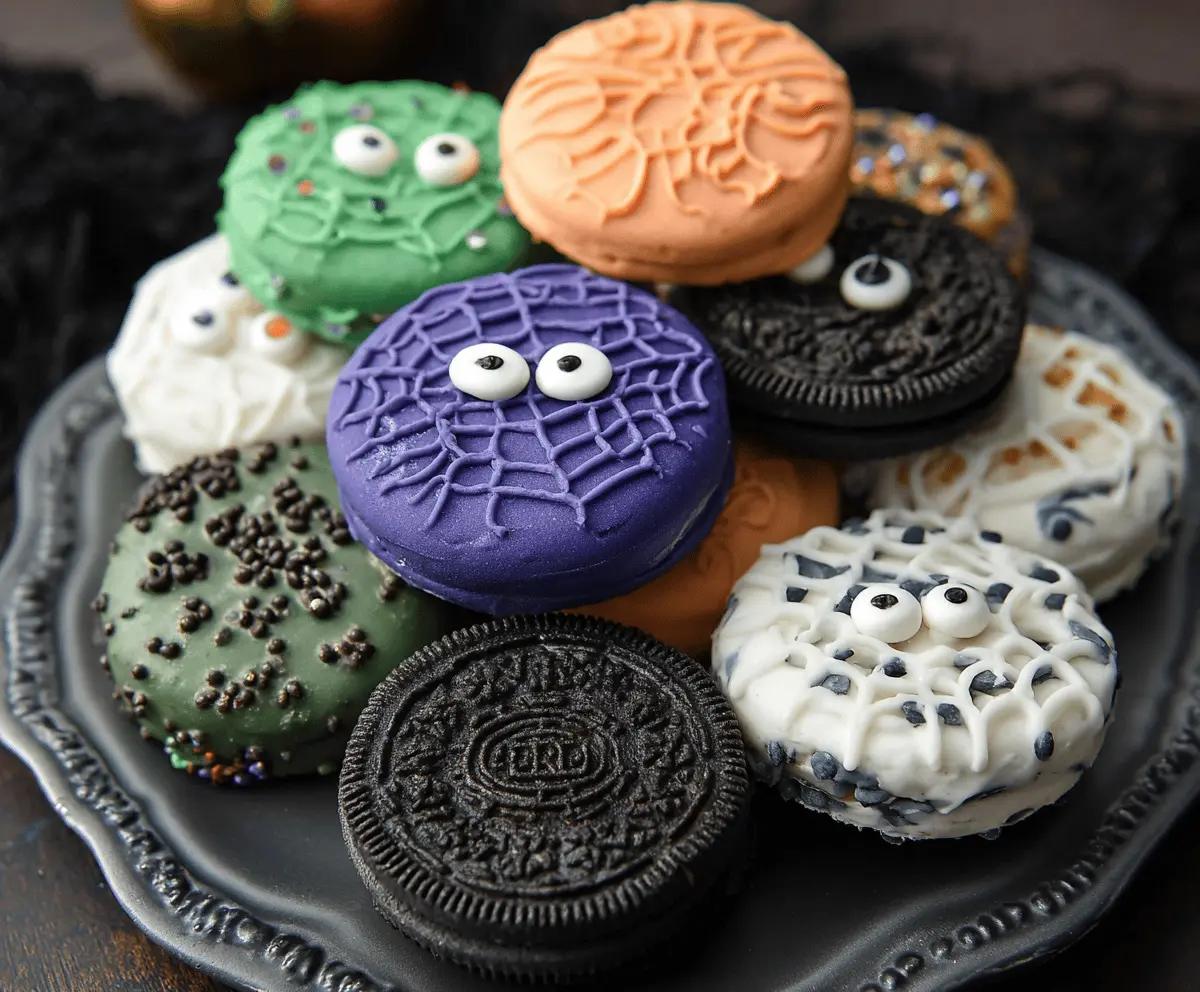
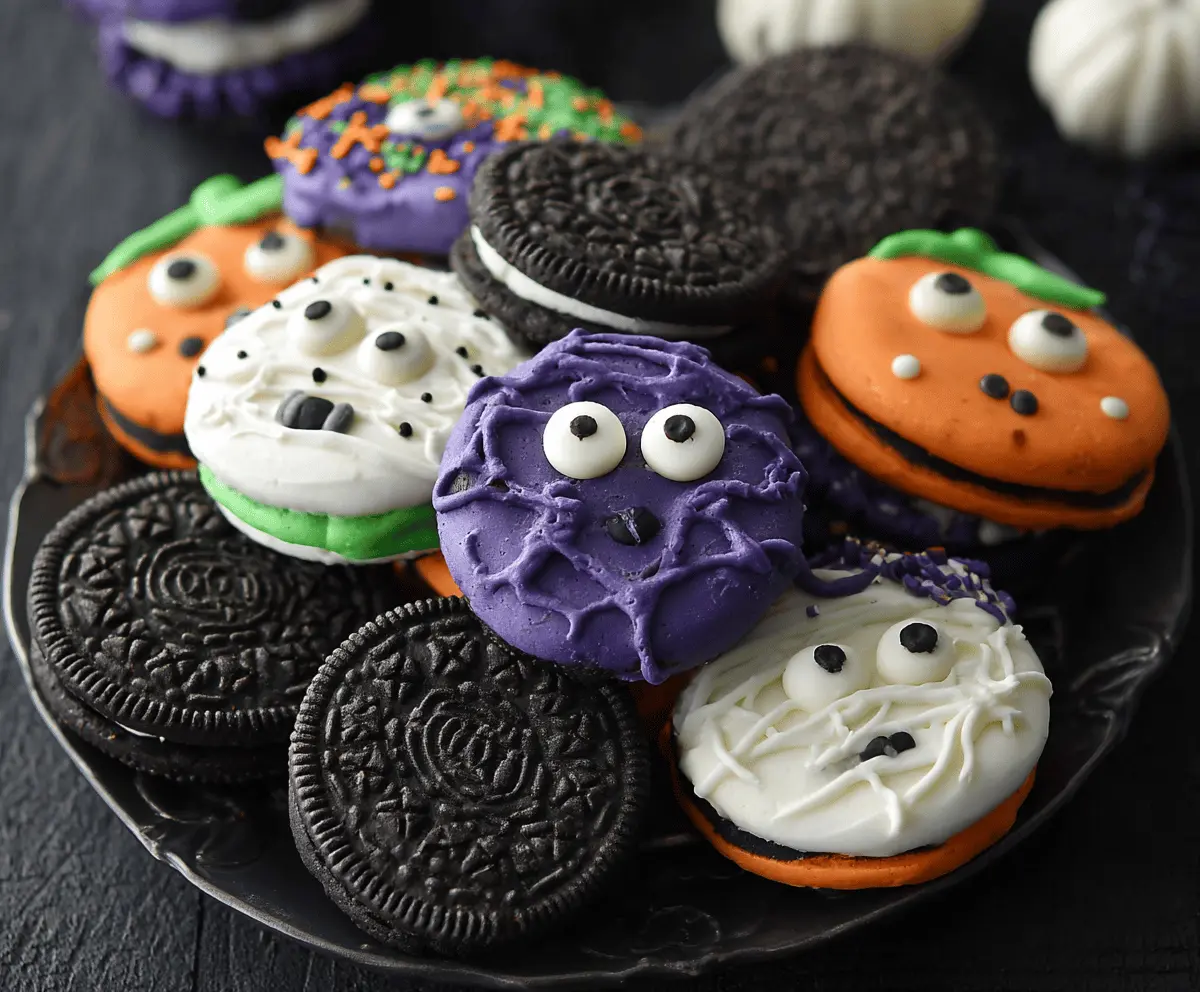
Halloween Oreos are a fun treat that combines classic Oreos with festive colors and spooky designs! These cookies are dressed up in orange and black, perfect for the spooky season.
Making these is so easy! Just grab some Oreos, dip them in melted chocolate, and add fun spooky decorations. I love sharing these at Halloween parties—it’s a treat everyone will enjoy! 🎃
Key Ingredients & Substitutions
Oreo Cookies: Traditional Oreos work best, but you can also use any chocolate sandwich cookies, like generic brands or gluten-free options, if needed. Vanilla-flavored cookies could give a different spin too!
Candy Melts: I opt for candy melts for their easy melting and vibrant colors. If you can’t find them, white chocolate chips work, but they might not be as bright in color. For a better color infusion, consider gel food coloring mixed into melted white chocolate.
Candy Eyeballs: These add a cute touch! However, if you can’t find them, you can use chocolate chips or small round candies for eyes instead! Just create your designs with what you have on hand.
How Do I Melt Candy Melts Without Burning Them?
Melted candy melts can be tricky, so here’s the easiest way to do it:
- Use a microwave-safe bowl. Add a small amount of candy melts, about 1 cup at a time.
- Microwave in 30-second intervals. Stir well after each interval to prevent burning.
- Stop heating when most of the melts are melted. Stir until smooth. Residual heat will melt any remaining chunks.
Remember, high heat can make them seize, so patience is key!
How Can I Get Creative with Decorations?
Don’t hesitate to mix and match colors and decorations! Try adding edible glitter or shredded coconut for fun textures. You can also create different designs—like Halloween ghosts or bats—using simple icing techniques.
How to Make Halloween Oreos
Ingredients You’ll Need:
- 1 package Oreo cookies (or similar chocolate sandwich cookies)
- 12 oz white candy melts (or white chocolate chips)
- Orange candy melts
- Purple candy melts
- Green candy melts (for pumpkin stems)
- Black decorating gel or edible marker
- Candy eyeballs (available at baking supply stores)
- Halloween-themed sprinkles (optional)
How Much Time Will You Need?
This recipe takes about 30 minutes of prep time plus an additional 30 minutes for the candies to set. Overall, you can enjoy your spooky Halloween Oreos in about an hour!
Step-by-Step Instructions:
1. Prepare Work Area:
Start by lining a baking sheet with parchment paper. This makes it easier to place your decorated Oreos after dipping them in the colorful candy melts.
2. Melt Candy Melts:
In separate microwave-safe bowls, melt the white, orange, purple, and green candy melts. Microwave each one in 30-second intervals, stirring after each interval until they’ve melted smoothly. Be careful not to overheat the candy—stirring will help melt any remaining chunks!
3. Dip and Coat:
Now it’s time to bring your Oreos to life! For pumpkin Oreos, dip each one into the orange candy melts, coating one side completely, and then place them on the parchment to dry. For mummy Oreos, dip them in the white candy melts, and again, let them sit on the parchment. Lastly, dip the Oreos in purple candy melts for spider designs.
4. Add Decorations:
While the candy coating is still wet, stick two candy eyeballs near the top of each Oreo. With the black decorating gel or edible marker, you can draw on fun faces like mouths or spider legs. For pumpkin stems, you can pipe small amounts of green candy melts onto parchment, let them set, and then attach on top of your orange Oreos using a little melted candy as glue. For mummies, draw thin lines over the white coating to mimic bandages. Don’t forget to sprinkle some Halloween-themed sprinkles for extra flair!
5. Allow to Set:
Let all the decorated Oreos sit at room temperature until the candy coating hardens fully, which usually takes about 30 minutes.
6. Serve:
Once set, arrange your spooky Halloween Oreos on a serving plate. Enjoy them at your Halloween party or share them with friends and family!
Enjoy creating these festive and delicious treats—perfect for any Halloween celebration! 🎃
Can I Use Different Colors for the Candy Melts?
Yes! You can use any colors of candy melts that you like. Get creative with festive colors or even mix your own shades using food coloring with white chocolate melts!
How Do I Prevent the Candy Coating from Cracking?
To prevent cracking, ensure that the candy melts are fully melted and smooth before dipping. Also, avoid refrigerating them too quickly after applying the coating, as rapid temperature changes can cause cracks.
How Long Do I Need to Let the Oreos Set?
Allow the decorated Oreos to sit at room temperature for about 30 minutes or until the candy coating is completely hardened. You can also speed up this process by putting them in the fridge for a short while.
What Can I Use Instead of Candy Eyeballs?
If you can’t find candy eyeballs, try using mini chocolate chips, M&M’s, or small round candies. You can even use icing or chocolate to create your own eyes on the cookies!